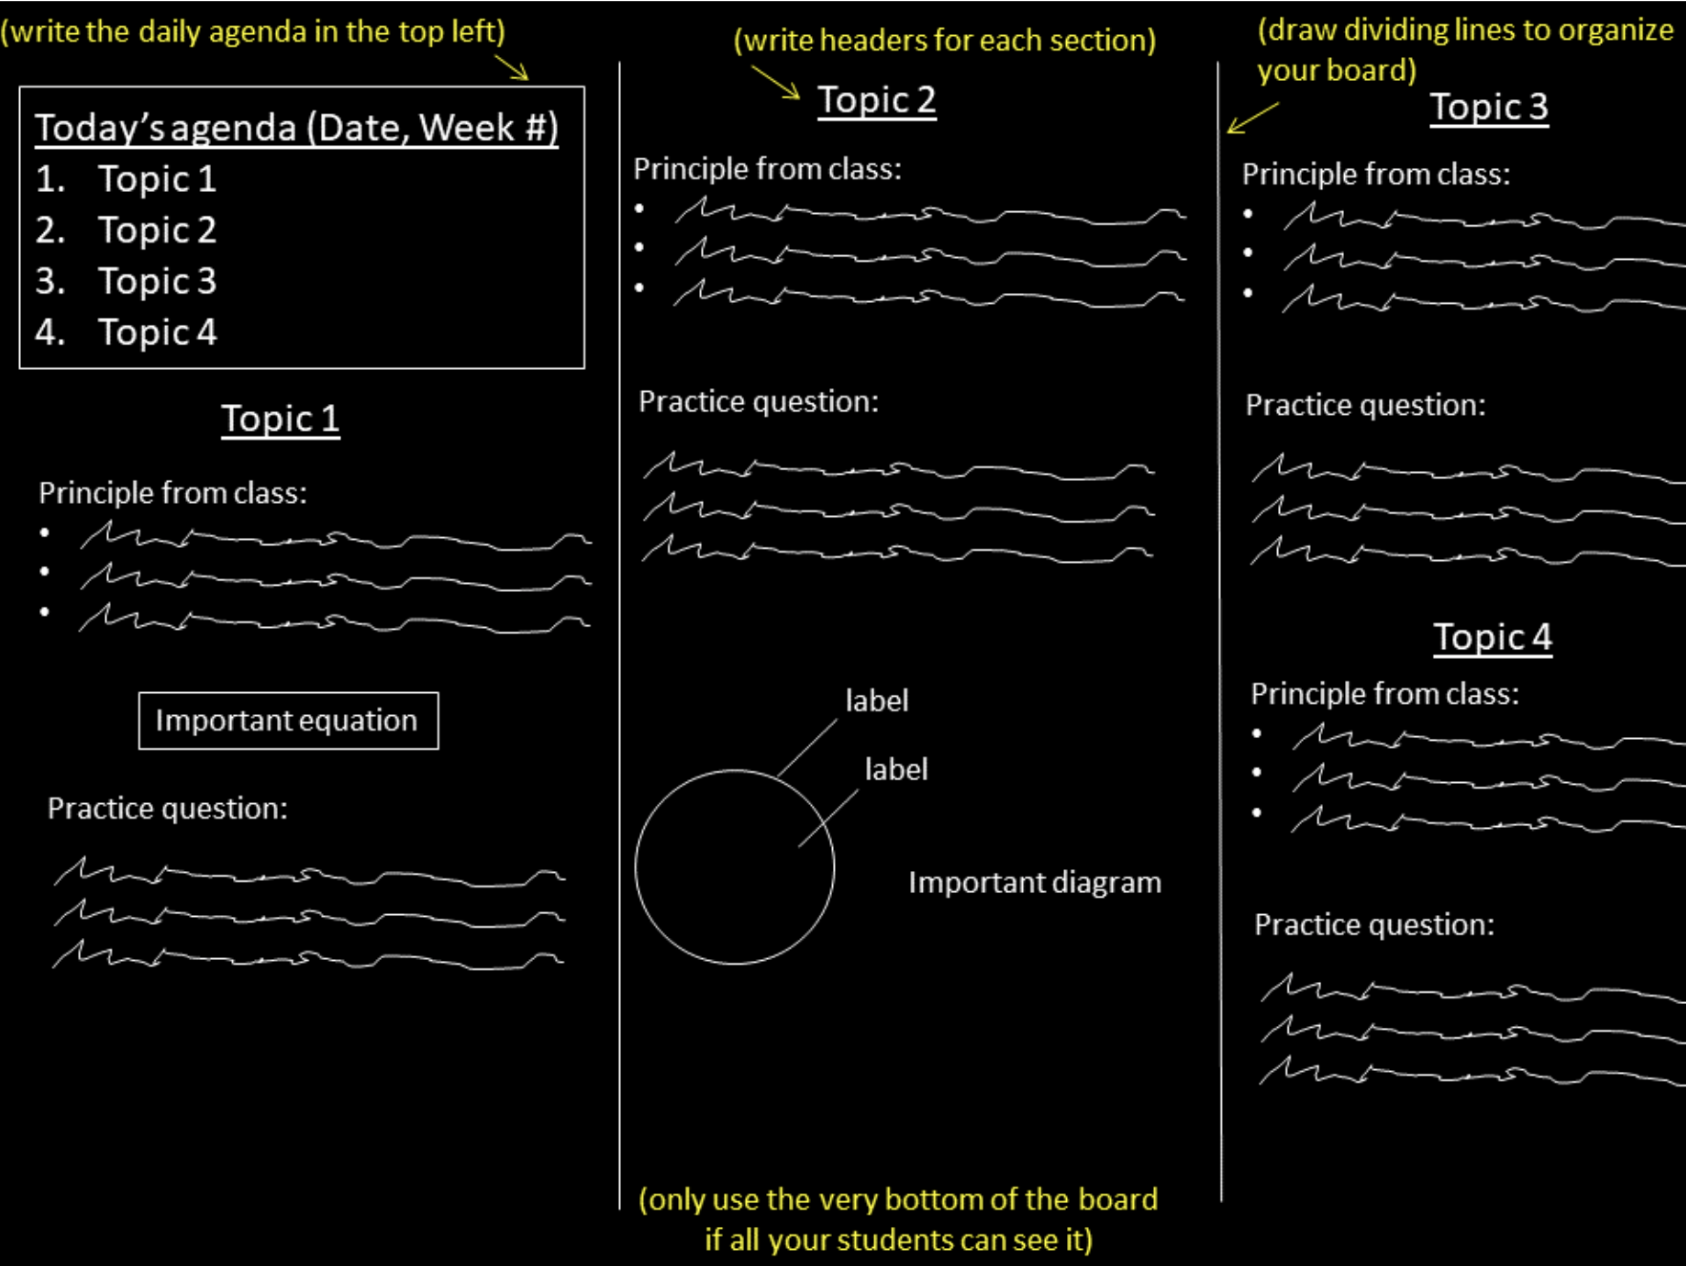
Divide up and organize your board space neatly: use an agenda/outline, headlines for each section of your board, titles, dividing lines, underlines, bullet points, numbered lists, boxes, diagrams, and legible labels to organize your boardwork.
Agendas and outlines:
Be sure to start your lesson with an agenda or outline that you should leave up on the board through the lesson so that students know what to expect, what their learning objectives are be for the day, where they are in the lesson, and so late students can see what they’ve missed.
Write the agenda/outline in the same part of the board consistently throughout the semester.
For any single class, use the agenda to keep yourself on track. For example, prepare to spend 10 minutes on the first agenda item, and then 15 minutes on the second item, and then 15 minutes on the third item, etc. If you need to spend longer than anticipated on one agenda item, plan where you are going to subtract time from subsequent agenda items. Agendas are great ways to transparently share your priorities with the students, and you can ask them if it is alright if you spend more time on one topic if that means spending less time on another topic. You can also use the agenda to move on if the class is stalling on a particular topic.
For most students, what you put up on the board is exactly what will be in their handwritten notes after class
You should think of your boardwork as a chronological transcript of what you’ve covered, starting at the top left, and moving to the bottom right using columns.
Do not erase anything unless you are completely out of space.
Don’t erase too soon. Allow students to have to time to read it, think about it, and write it down. Before erasing anything, check with the students first before by asking “Is it alright if I erase this?”
Do not reuse earlier boardwork, as students will not be able to “reuse” their handwritten notes in the same way. Reusing earlier boardwork will cause their notes to be less of a linear transcript that they can study from and make sense of later.
Stand back occasionally and ask yourself whether a student looking back at these notes a month later could reconstruct the lesson.
Don’t skip around the board. Use the board sections in an orderly way. Start at the top of the extreme left panel, move down in a column, and then continue at the next panel on the right.
When the board is full, erase it cleanly and start over at the top-left again.
Don’t reuse diagrams
Do not go back and add to or modify earlier parts of your boardwork, especially diagrams.
Instead, redraw diagrams, multiple times if necessary, to illustrate different features.
Don’t let diagrams become too cluttered or complicated.
Some people try to “animate” their boardwork by erasing components and changing figures or equations as the problem is worked out. This can be very hard for students to copy into their notes and study from later. If a student will have to redraw something to create clear notes, then it is worth redrawing that thing on the blackboard, as well.
Label everything
Labels take just a moment to write down, and you should feel free to use abbreviations (as long as they are clear to the students). Be sure to label everything, including newly introduced symbols, equations, and all the parts of diagrams.
The difference between a squiggly line and a wire loop is appropriate labeling.
Try to avoid using multiple colors
Few students bring pens or pencils in multiple colors, so if you rely on multiple colors in your boardwork, students may be frustrated.
If you need to use multiple colors, ask your students to bring colored pencils or bring your own for them to use.
Practice drawing the pictures or diagrams ahead of time. This is particularly important for complicated diagrams, terms, formulae, etc.
Pull the shades if there is sunlight or glare on the board. (Students who have difficulty seeing the board often suffer in silence rather than ask for the shades to be drawn.)
Break your chalk in half or hold it at a different angle if it squeaks. If you are using a whiteboard, make sure you have markers that work.
Try different chalk sizes to see what works best for you and your class.
Using the very bottom of the blackboard can be hard: both to write on as the teacher, and to see as a student.