Sidebar
The sidebar is located in the area below your left navigation. Adding sidebar content can be done a few different ways.
(See samples of each type of sidebar content on the left sidebar of this page.)
Types of Sidebars content types include:
- Sidebar Contact Info Block
- Sidebar Text with Photo Block
- RSS Feed Block
- Folder Sidebar Block
- Editor
- Call to Action Buttons
- Announcements
Four of the Sidebar content types are created from blocks: Sidebar Contact Info Block, Sidebar Text with Photo Block, RSS Feed Block and Folder Sidebar Block. To use a sidebar block on a page, you must first create the block.
Sidebar Contact Info Block
The Sidebar Contact Info Block is used to display contact information with optional social media links. To create a new block, click + Add Content from the top black menu bar, then select Sidebar Contact Info Block.
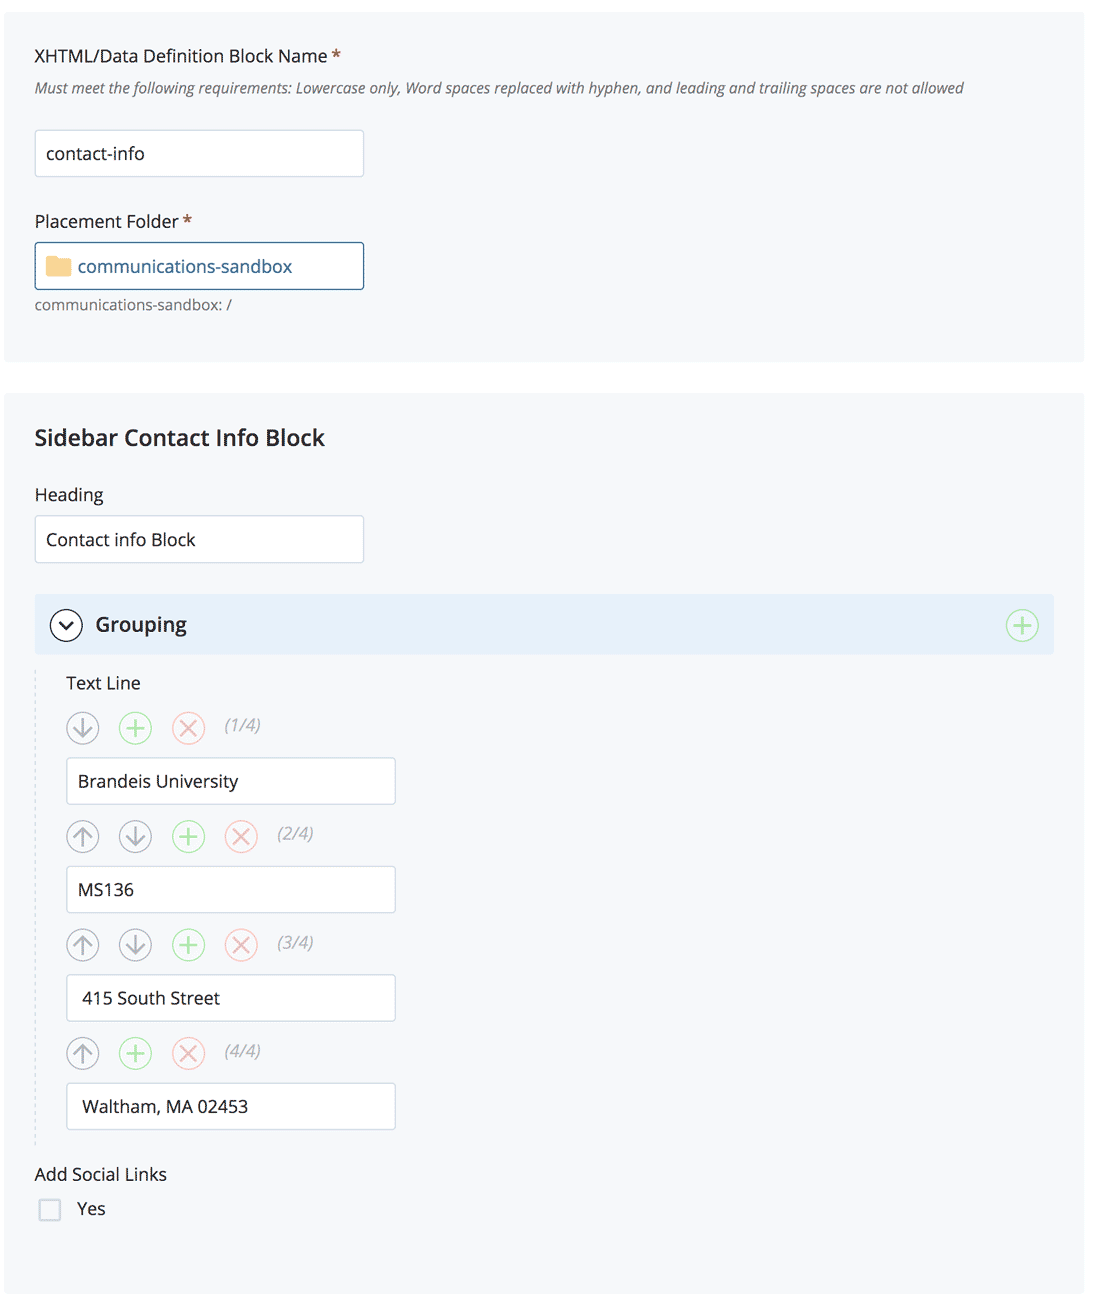
- XHTML/Data Definition Block Name (previously System Name): contact-info is the default system name. We recommend leaving this name unless you have multiple contact info blocks that need differentiation.
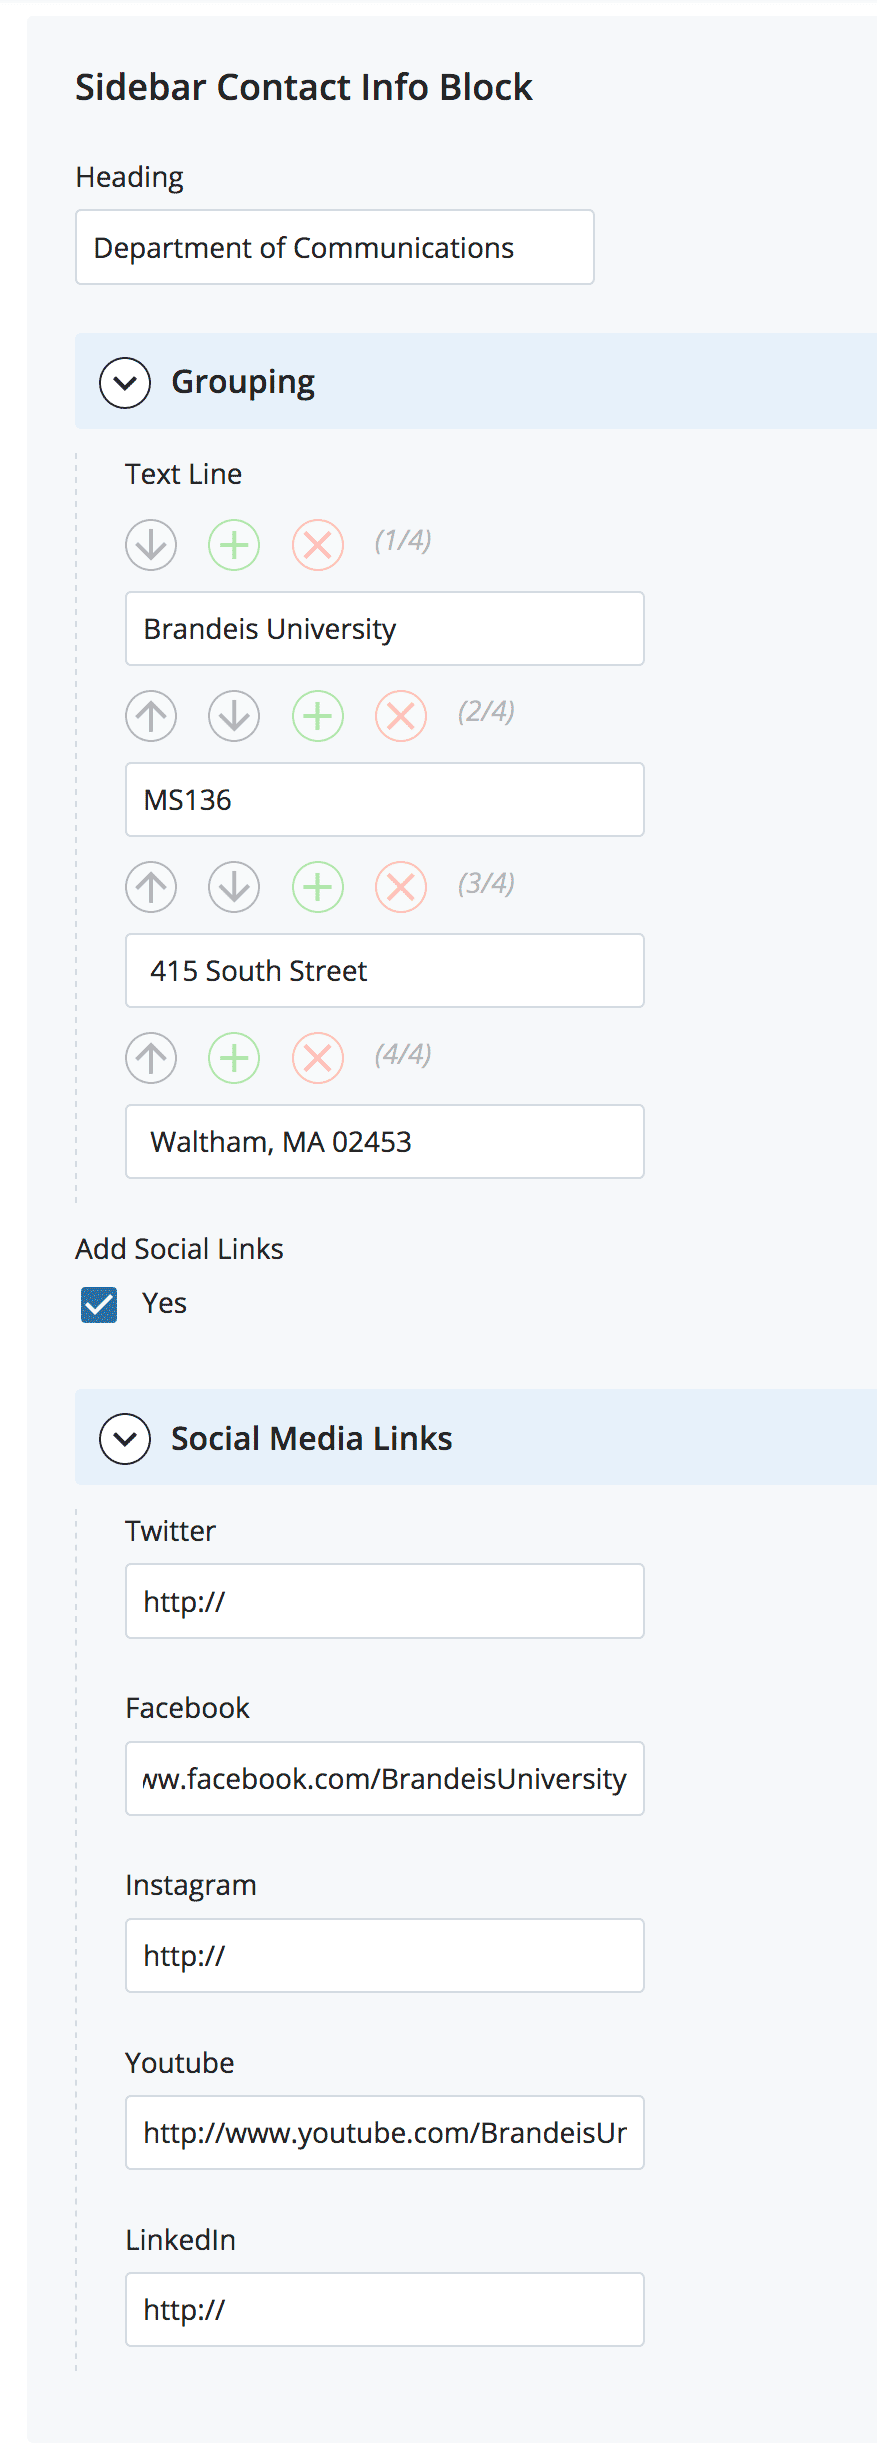
- Heading: Enter a Headline. Use Initial Caps. Examples: Department of Communications or Contact Us.
- Text Line: Enter your text. Example: Brandeis University
- Use the green plus icon ( + ) to add more Text Lines. Example: For the following text, you would need four Text Lines.
Brandeis University
MS136
415 South Street
Waltham, MA 02454 - Once you add a second Text Line field, you will see options to move content (using the up/down arrows) or delete content using the red delete ( x ) icon.
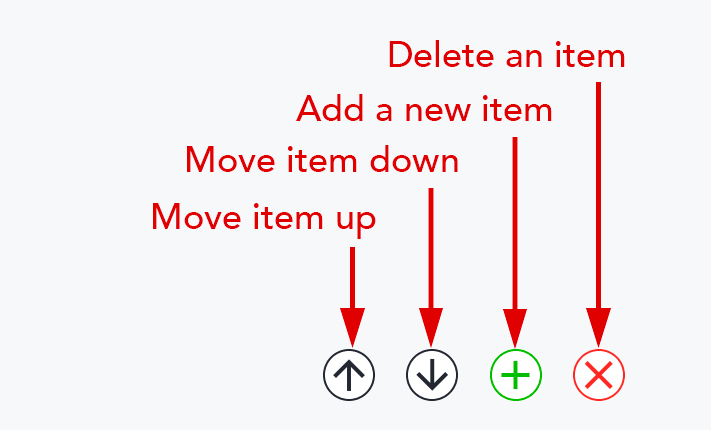
- Check the box next to Add Social Links to add your social media URLs (optional). You do not need a link for every platform. Icons will only show up for the platforms where links are added.
You do not need a link for every platform. In the example below, only Facebook and YouTube links will appear:
- Once you are finished, submit.
Note: You will not see a preview of your formatted block. Add your block to a page to view it.
Sidebar Text with Photo Block
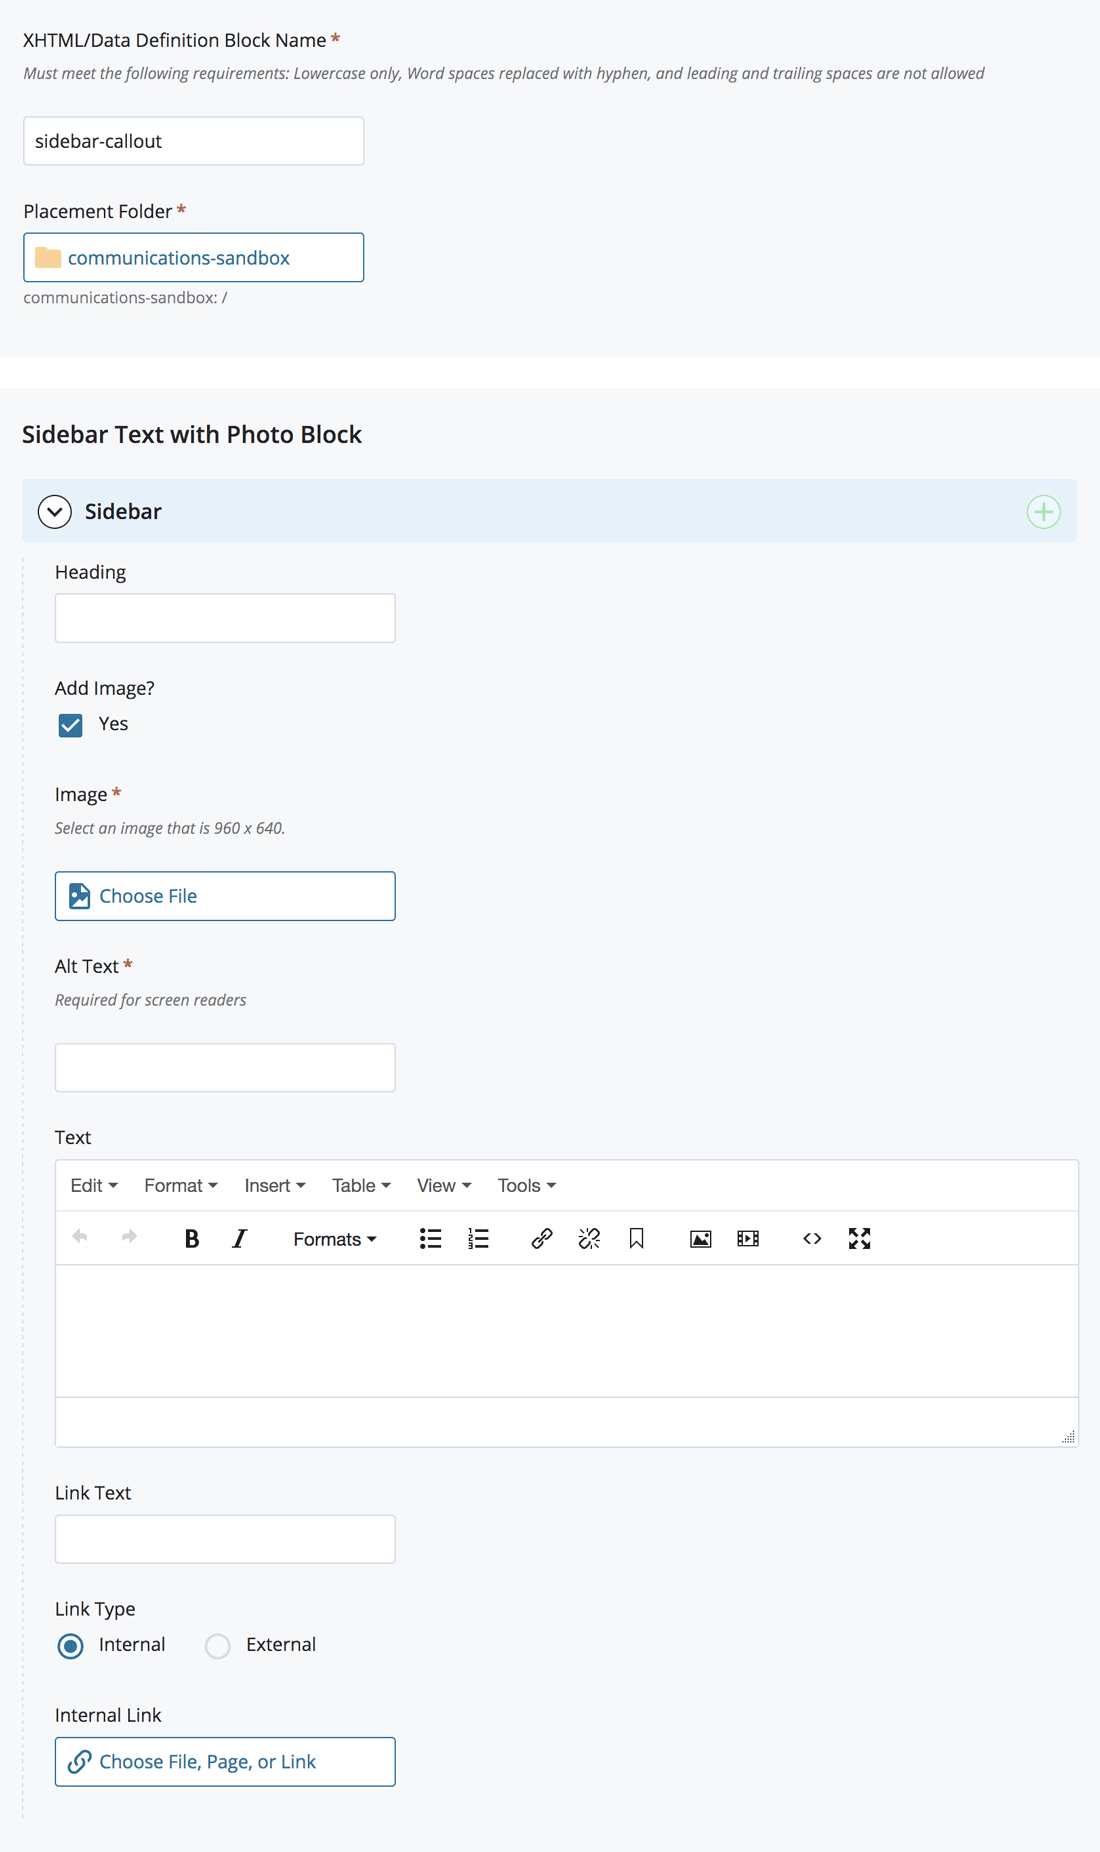
The Sidebar Text with Photo Block is a flexible content area with a headline, purple horizontal Swiss bar and text (can include formatted text like links). To create a new block, click + Add Content from the top black menu bar, then select Sidebar Text with Photo Block.
-
XHTML/Data Definition Block Name (previously "System Name"): sidebar-callout is the default block name. You may keep this name or edit it. If you edit it, please only use lowercase letters and separate words with hyphens.
-
Heading: Add your Headline. Example: Did You Know?
-
Add Image: If you want an image to appear, check this box. Your image dimensions must be 960 px x 640 px. If you add an image, you must add Alt Text to describe your image. This text will be read to people who cannot see the image.
-
Text: Enter and format your text. Be sure the text in the Editor is formatted as Paragraph text.
-
Link Text: This creates a formatted text link (in ALL CAPS) below the text you enter above. If you are using an Internal Link, click Choose File, Page, or Link. In the Chooser Panel, you can select a recent internal page, or browse for an internal page. If you are using an External Link, enter the URL, including the https://.
- Once you are finished, submit.
Note: You will not see a preview of your formatted block. Add your block to a page to view it.
RSS Feed Block
The RSS Feed Block displays titles and links from an RSS feed, such as a blog. To create a new RSS Feed Block, email cmshelp@brandeis.edu and a member of the Web Team will assist you.
Folder Sidebar Block
The Folder Sidebar Block is used to create the same sidebar content for all pages within a specific folder. To create a new block, navigate to the folder where you would like the Folder Sidebar Block block to be located. It is important to add the block to the folder that houses the pages where you will be adding the sidebar. Click + Add Content from the top black menu bar, then select Folder Sidebar Block.

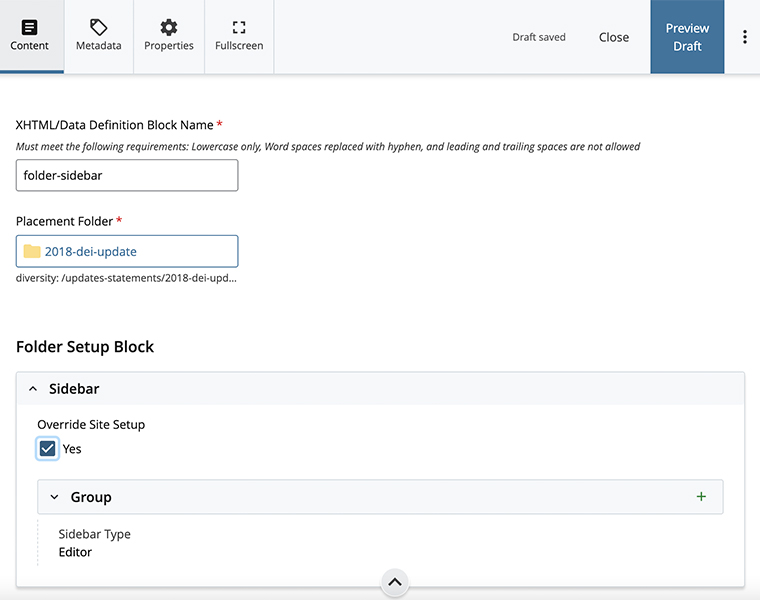
- XHTML/Data Definition Block Name (previously System Name): Leave folder-sidebar. The block will not work if you change this name.
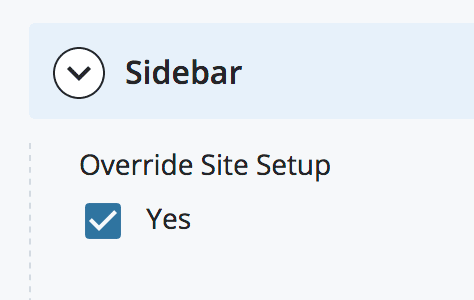
- Override Site Setup: Check the “Yes” box in the Folder Setup Block to override site setup.
- To choose a sidebar type and add content to your block, begin at step three of "Adding Sidebar Content to a Page."
- When you are finished, submit. Once published, all the pages in that folder that do not have 'override site and folder set up' in the Sidebar section checked off will display the content added in the Folder Sidebar Block.
Note: You will not see a preview of your formatted block. To view your block, navigate to any of the pages within the folder where you added the Folder Sidebar Block.
Adding Sidebar Content to a Page
You can set up sidebar content so that all pages on your site or within a folder have the same content. To set up all pages on your site with the same content, you will follow the steps for the site-setup block for your site. To set up all pages within a folder with the same content, follow the Folder Sidebar Block instructions above. To add or edit sidebar content to a single page, follow the steps below.
- Navigate to your page and click Edit.
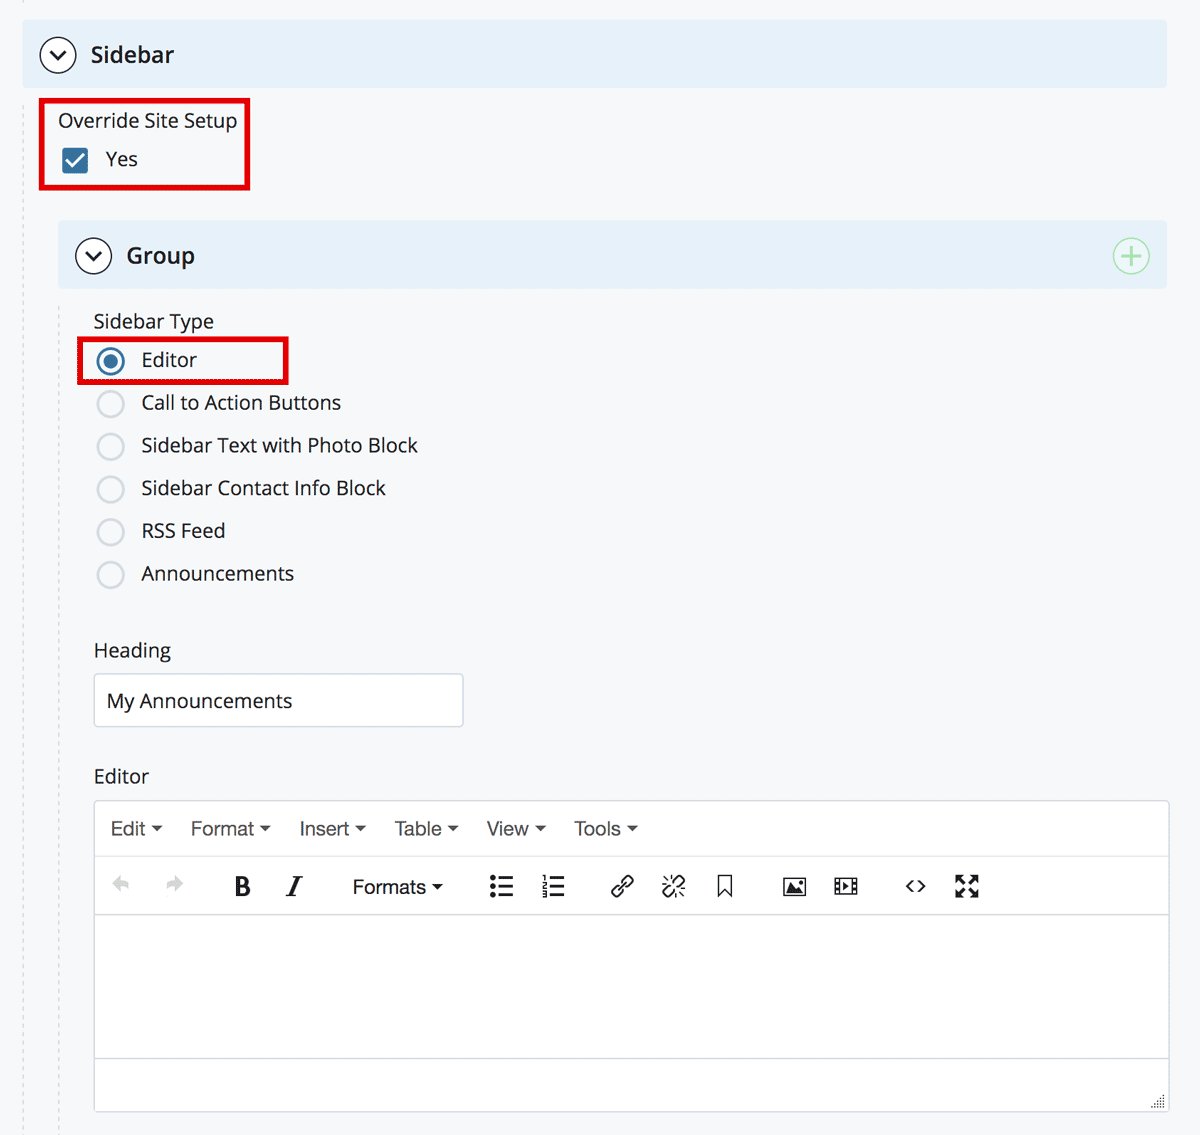
- Scroll down to the Sidebar section. Check the box next to Override Site and Folder Setup.
- Click the > Group button to expand the content.
You will see six radio buttons with types of sidebar content: Editor, Call to Action Buttons, Sidebar Text with Photo Block, Sidebar Contact Info Block, RSS Feed and Announcement.
Editor
Enter and format your content directly in the WYSIWYG editor.
To add another Sidebar type, click the green plus icon ( + ) in the top right part of the screen.
Once you add a second Sidebar type, you will see options to move content (using the up/down arrows) or delete content using the red delete ( x ) icon.
![]()
Call to Action Buttons
Create clickable button(s). Buttons will be automatically formatted with black text in ALL CAPS. Buttons will be white with a black border.
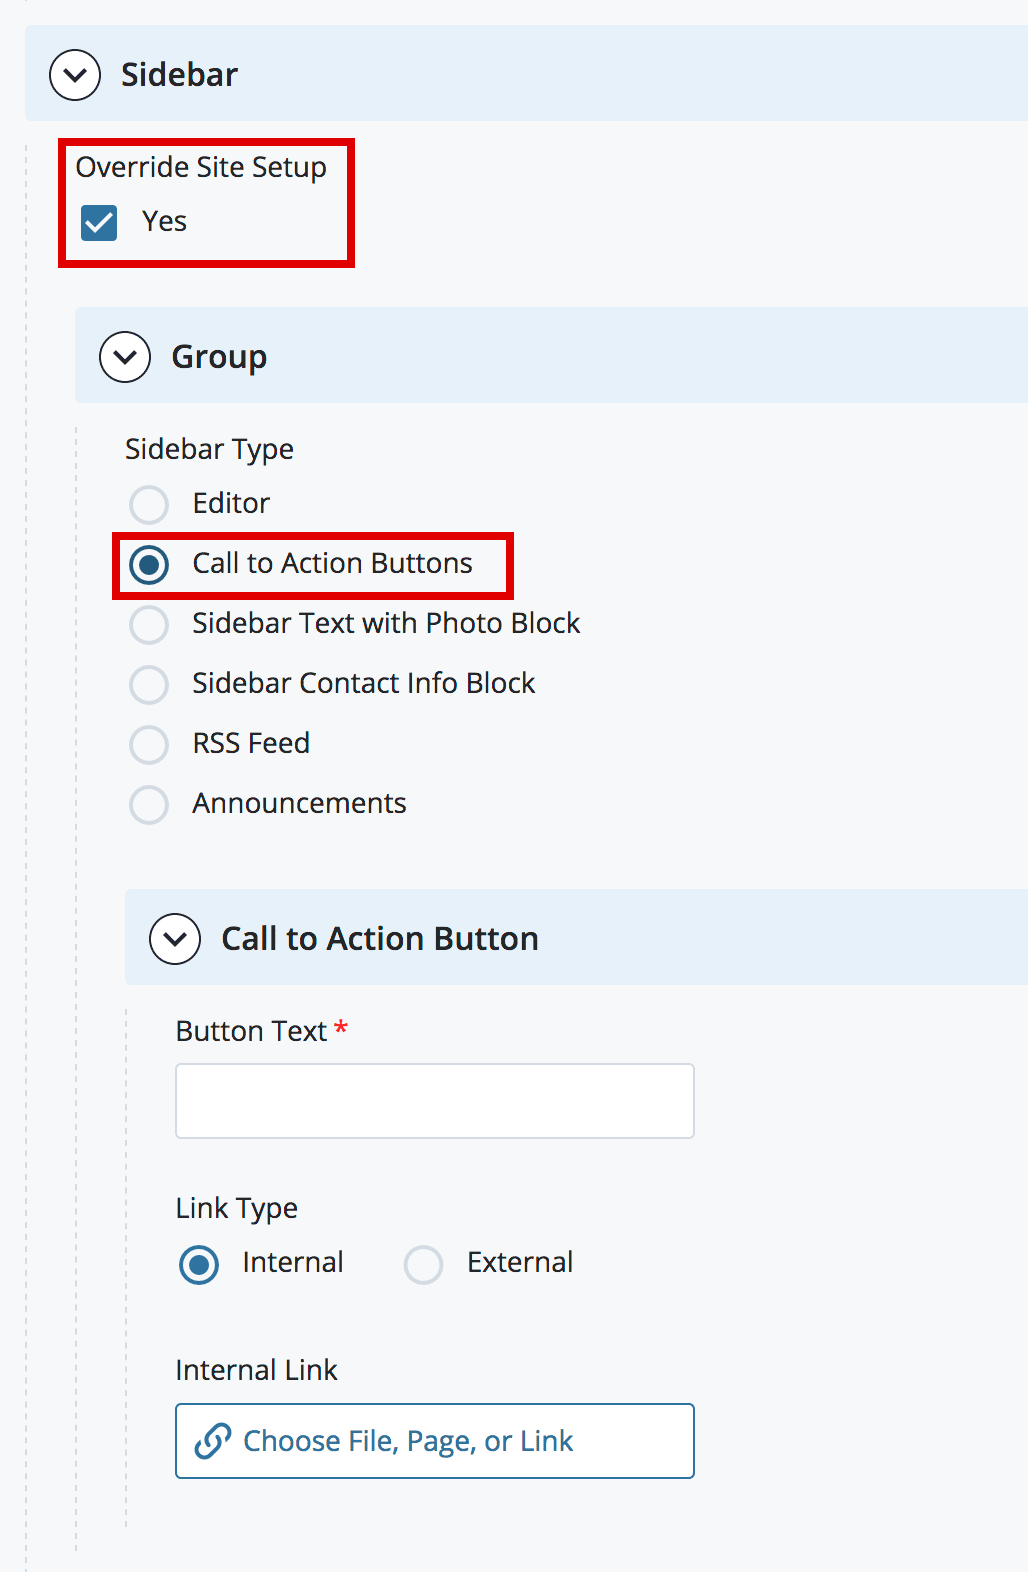
Button Text: This is the text that will appear within your button. Keep your Button Text brief and descriptive. Do not use any variation of the phrase “Click Here.”
Examples:
- Application Materials Due May 1
- Explore Our Programs
- Make an Appointment
Link Type: Internal/External Link: If you are using an Internal Link, click Choose File, Page, or Link. In the Chooser Panel, you can select a recent internal page, or browse for an internal page. If you are using an External Link, enter the URL, including the https://.
Note: If you do not enter a URL, your button will appear but it will not be clickable.
- To add a new Call to Action button, click the green plus icon (+) in the light blue bar to the right of the words Call to Action Button (not in the blue bar which says Group).
- To add a new sidebar item, click the green plus icon ( + ) in the light blue bar to the right of the words Group (not in the blue bar which says Call to Action Button).
Once you add a second Sidebar type, you will see options to move content (using the up/down arrows) or delete content using the red delete ( x ) icon.
Sidebar Text with Photo Block
Search or browse for a Sidebar Text with Photo Block you have already created.
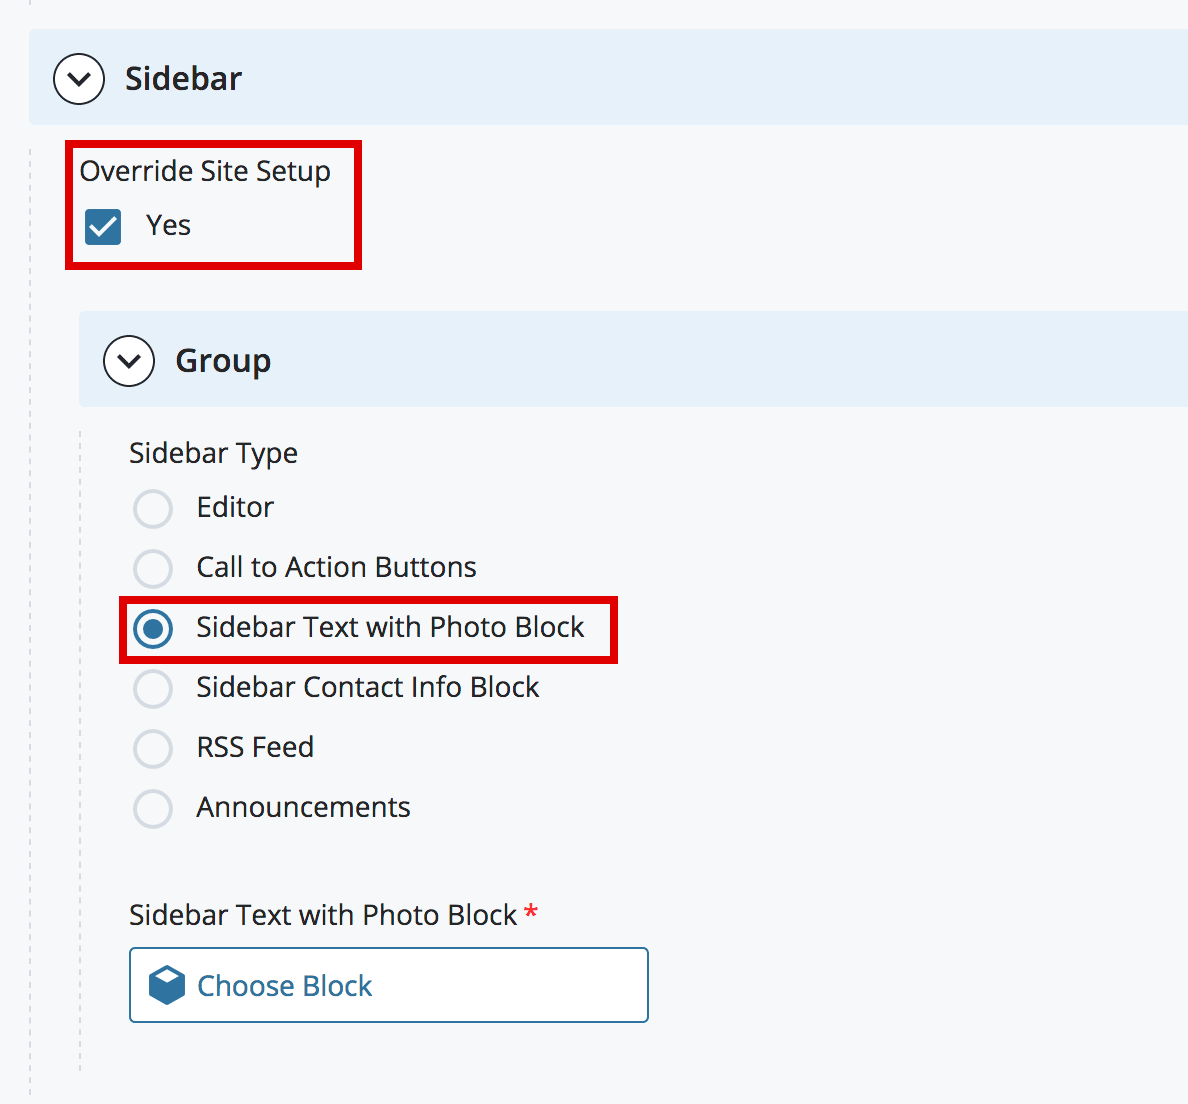
To add a new sidebar item, click the green plus icon ( + ) in the light blue bar to the right of the words Group.
Once you add a second Sidebar type, you will see options to move content (using the up/down arrows) or delete content using the red delete ( x ) icon.
![]()
Sidebar Contact Info Block
Search or browse for a Sidebar Contact Info Block you have already created.
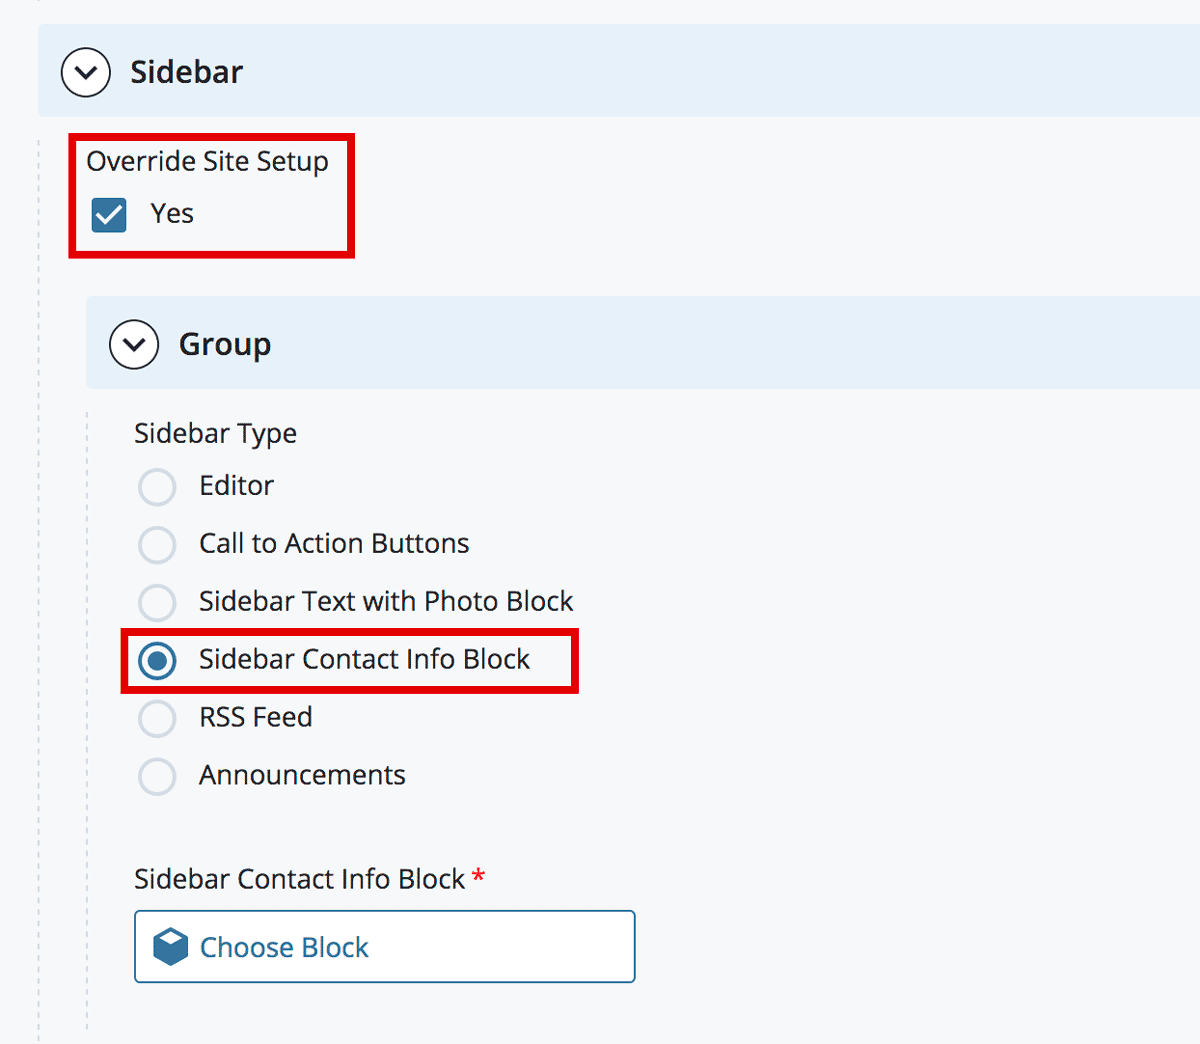
To add a new sidebar item, click the green plus icon ( + ) in the light blue bar to the right of the words Group.
Once you add a second Sidebar type, you will see options to move content (using the up/down arrows) or delete content using the red delete ( x ) icon.
![]()
RSS Feed
Search or browse for a RSS Feed block that the Web Team has created for you.
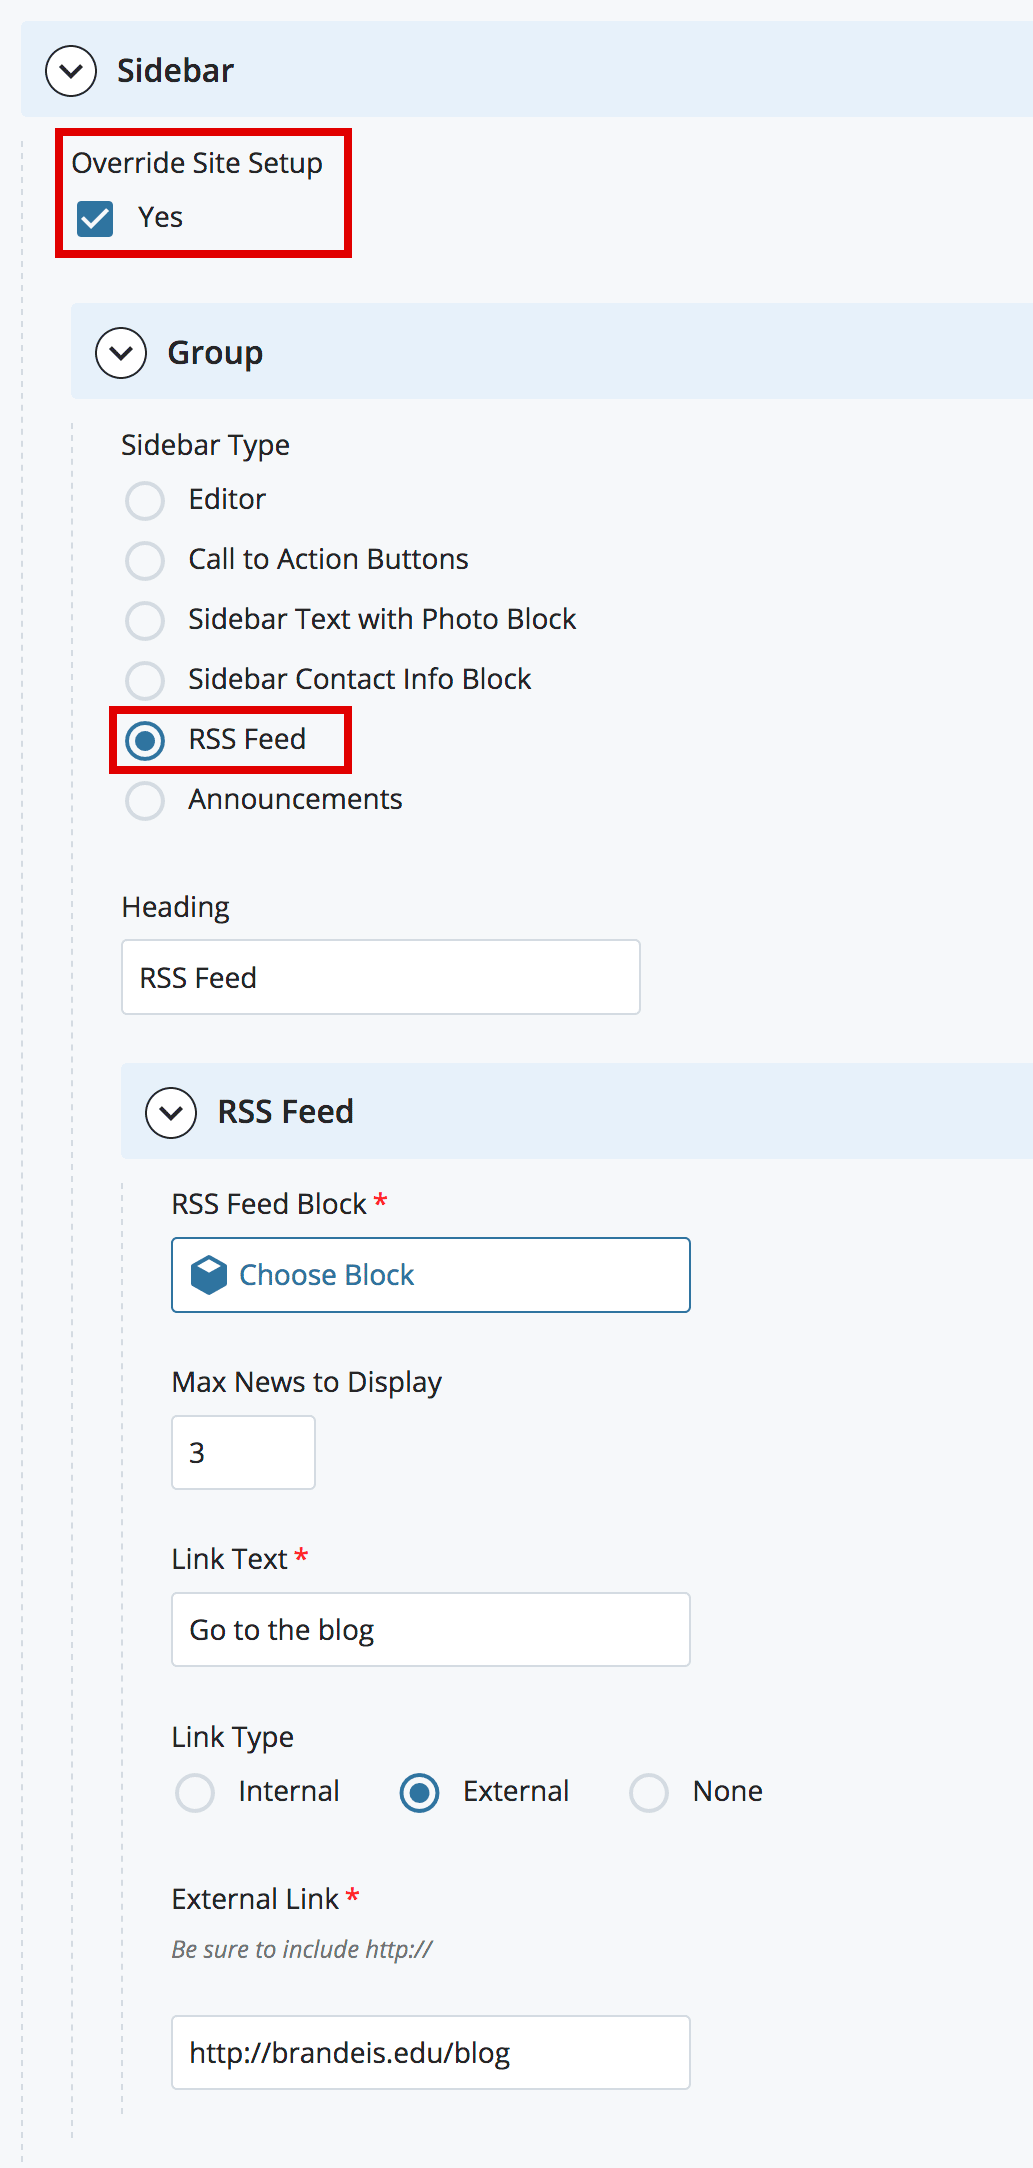
Heading: Add your Headline. Example: "Economics Department Blog"
Max News to Display: Enter a number of titles you want to appear in the sidebar. We recommend 3 to 5.
Link Type: This creates a formatted text link (in ALL CAPS) below the text you enter above. If you are using an Internal Link, click Choose File, Page, or Link. In the Chooser Panel, you can select a recent internal page, or browse for an internal page. If you are using an External Link, enter the URL, including the https://
To add another Sidebar type, click the green plus icon ( + ) in the top right part of the screen.
Once you add a second Sidebar type, you will see options to move content (using the up/down arrows) or delete content using the red delete ( x ) icon.
![]()
Announcements
The Announcement sidebar content type will display the titles of indexed Announcements from the main Announcements Content Type.
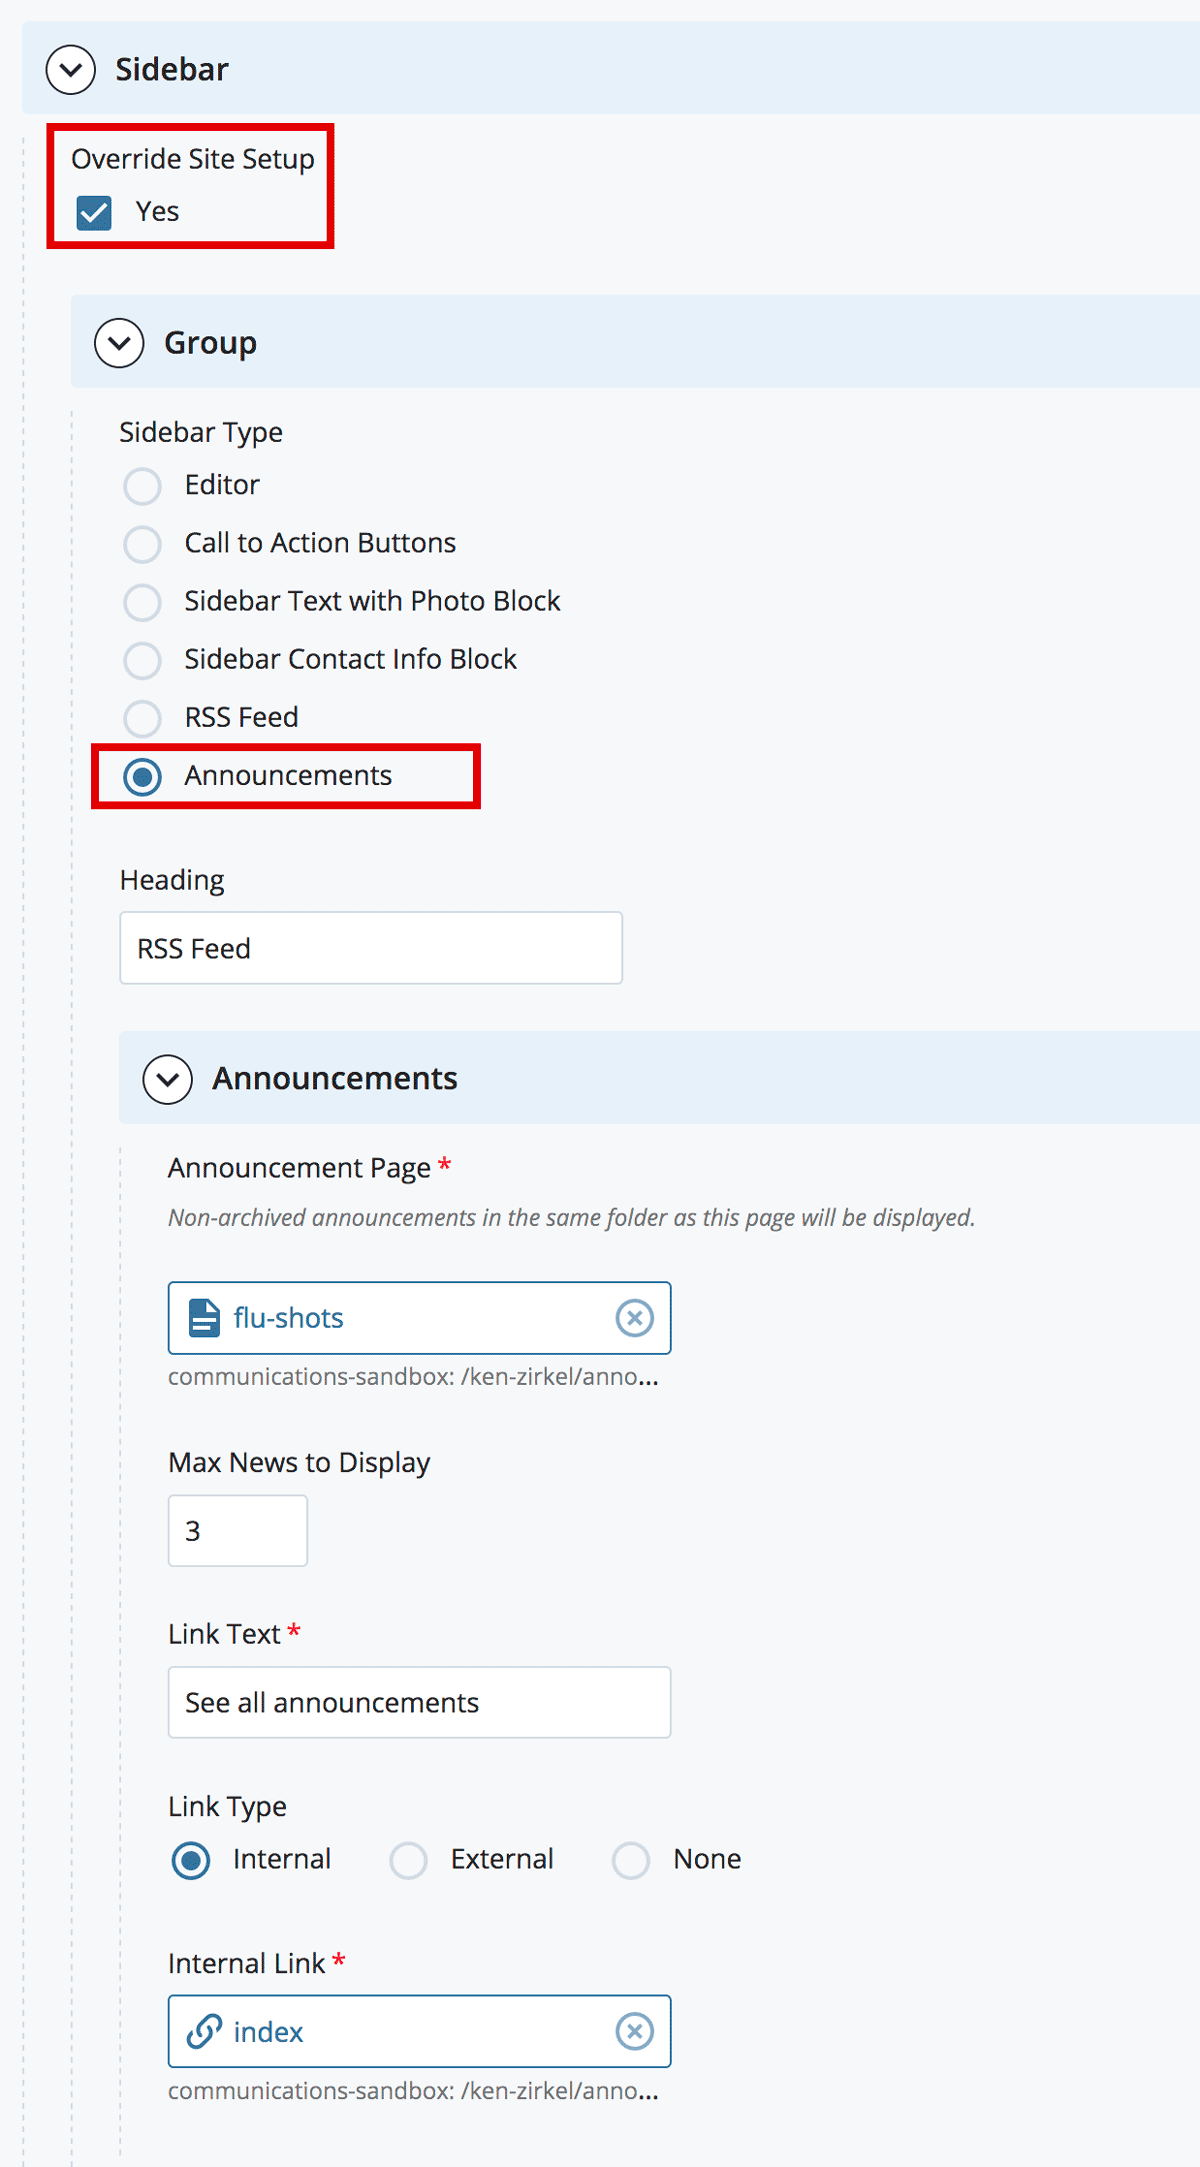
Heading: Add your Headline. Example: "Recent Job Postings"
Announcement Page: Browse to the folder on your site where your Announcements Content Types are located. Select any asset in the folder.
Max News to Display: Enter a number of titles you want to appear in the sidebar. We recommend 3 to 5.
Link Type: This creates a formatted text link (in ALL CAPS) below the text you enter above. To have the link go to your main Announcements page, select Internal Link and the Chooser Panel will open to allow you to Search or Browse for the index page in your Announcements folder.
- Getting Started
- Building and Editing
- Accessibility
- Best Practices
- Frequently Asked Questions
- A-Z Help List
- Home
Sidebar Editor
This sidebar content is being displayed using the Editor radio button.
Sidebar Text with Photo Block

You can find a list of every topic in the CMS Guide in the A-Z Help List.
View the A-Z Help List